|
Advertisement / Annons: |
Tutorial:
|
Content:
Note: |
3, How to use the background light to create a flat image:Normally you use this tool when you don't have any master flats. My earliest photos I didn't take flats to and now when the equipment is sold I can't take new. Even when I have flats they could be of low quality. And there are photos of comets that I can't take new photos of because they have disappeared. These photos are very interesting if I can increase the quality of with flats. In this case I use the background light in the image to get some idea how much the vignetting is. There are always gradients on the sky, but with a telephoto lens it's narrow angle it's not very much. This lens is a full frame Pentax 500 mm f/4.5, the comet on the image is Lovejoy from 2013. 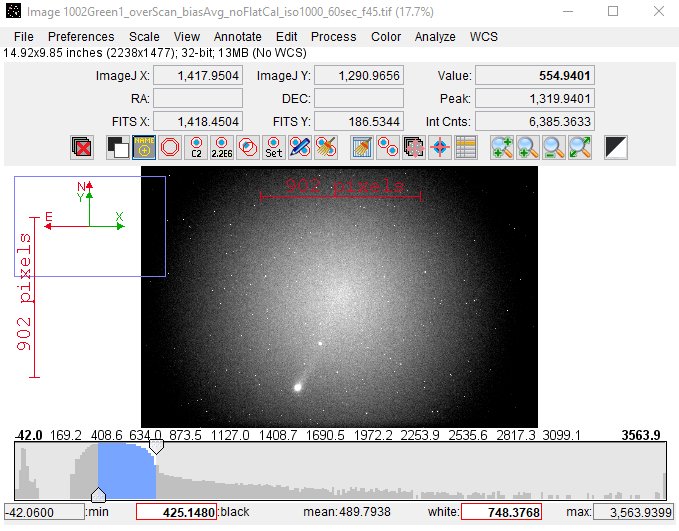
This image is demosaiced and it's the green channel. When demosaicing you get half size of the image. This one I have read out with the over scan area too (special for Canon EOS), that means that the optical center will be shifted about 35 pixels to the left, it's camera dependent. The image is bias subtracted which is very important, otherwise the math will go wrong. If you don't have a bias image you can subtract a constant from the image that correspond against the bias, that's the method I always do because a bias image will add random noise. As you see the vignetting is strong, the signal loss at the edges is about 50 %. That is what I want to correct with a synthetic flat image. Fill in data in the Excel sheet: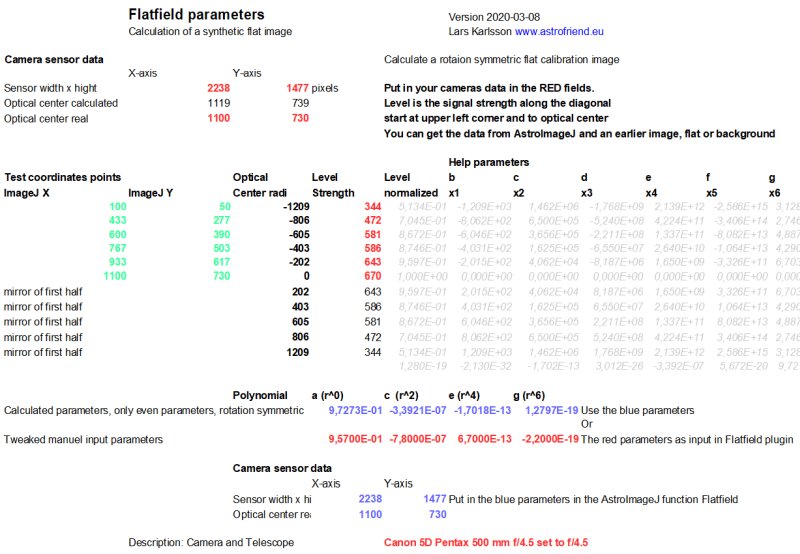
I start according to earlier page and put in data of the size, optical center and the level values along the diagonal towards optical center. That's the upper red fields. If you have a star or something bright at the position, move the cursor in a circle with the optical center as origin (keep the same radius) and get the value from the new point. Direct I have the parameters for the polynomial calculated, the blue fields. Enter the data in the Flatfield plugin:The parameters values I got I now put in the Flat plugin which I and Lars has constructed to use with AstroImageJ. I will go through the details later. Now I only show the result from it Creation of synthetic flat image: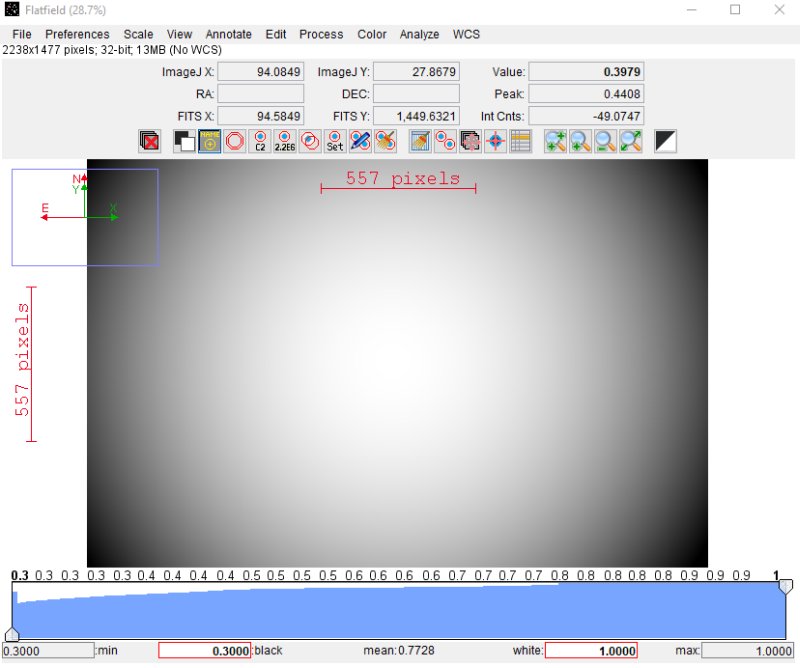
This is the flat image the plugin Flat created from the parameters I put in from the Excel sheet. All flat images will visible look very similar even if you change the parameters. The center is normalized to have the level around = 1. As you see there is no dust blobs or static pattern in this flat image. At the edges where the vignetting is strongest the values are not allowed to be lower than 0.3 (70% drop in signal relative center). If the optic is so bad that the vignetting is worse than that it's not very usable at the edges. Better to concentrate on the good quality area and get that more flatter and crop it out later. If the signal has dropped by 75% at the edges it also means that the noise is twice more here compare to the center. Divide image with flat image: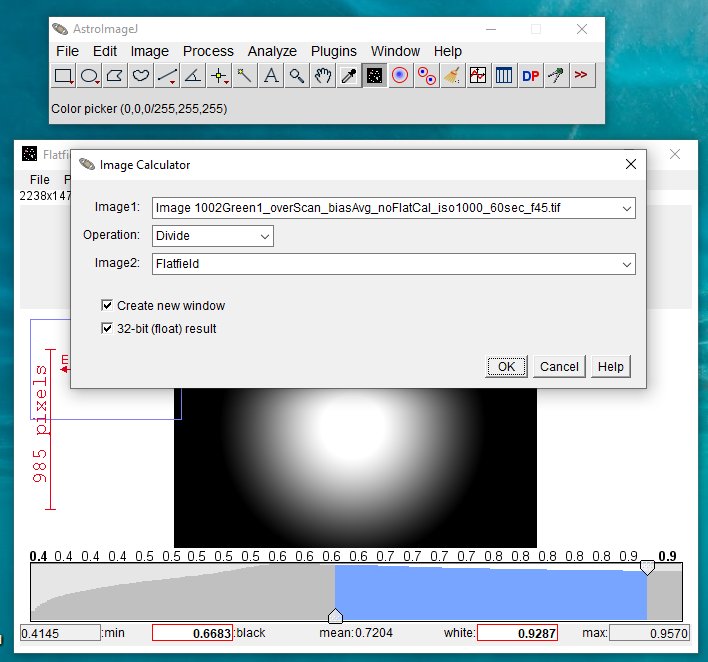
You find the Image Calculator under the tab 'Process'. Choose correct images to divide. Enable 'Create new window' and '32-bit float result'. First flat calibrated image: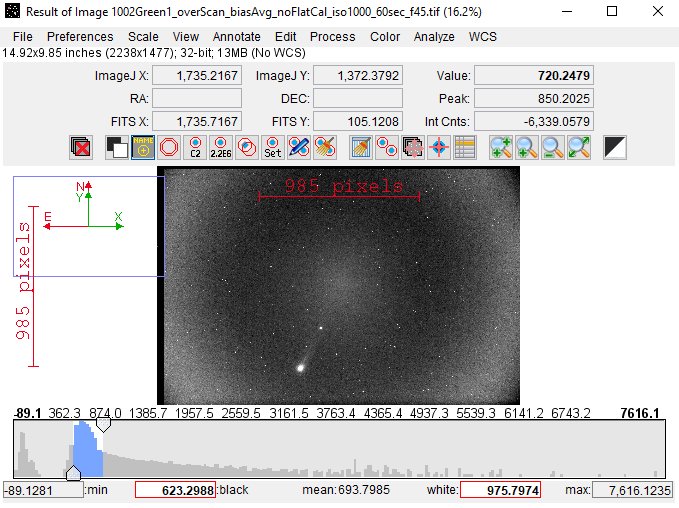
This is the result with the automatic calculated parameters. Not perfect but much better than before. This old Pentax lens has a complicated vignetting pattern with a sharp spot in center, difficult to handle. I had to rewrite the function from fourth degree to sixth degree to come closer to a flat image. The contrast is increased to make it more visible. Tweak the parameters:
Let us give a try if we can find better parameters and make the image flatter. You can direct test different parameters in the Flatfield plugin, but it's difficult. I have made some tools in the Excel sheet that make it easier. Below center, the calculated parameters, the blue fields. There are some red fields above 'Tweaked manual input parameters' where you can type in different figures. Even a small change of a parameter can have a dramatic effect on the curve that fits to the image. Curve of polynomial: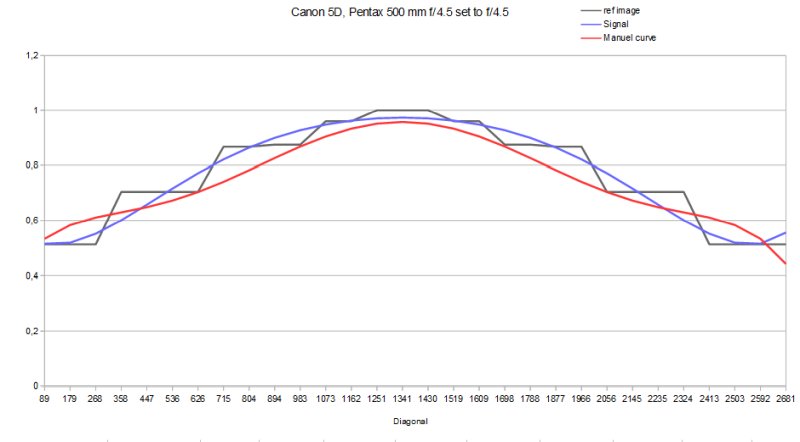
There are three different curves.
The first line doesn't have many points, but enough to do a six degree polynomial fit. In center the level is about = 1. It means when you divide the central area of an image with the flat image the result will be almost as before. But lower values at the edges where the vignetting is strong it will increase the signal when divide. Example: when divide 2 by 0.5 you get 4. That's how the flat calibration work. Now if we study the calibrated image once again. We note the center is bright with a dark ring around and outside that a bright ring. We want to increase the signal between these rings and at the most outer corners. If you look at the red curve above you see how I have with different parameters get the red line below the blue line where I want to increase the level. Places where it's above I want to decrease the level in the calibrated image. The corners are difficult because the lens is not optimal for a full frame camera even if it was constructed for that 40 years ago, our demand are higher today. I could of course have closed down the aperture and got a better result, but in this case I wanted it to be fully open, all light I could get. Flat calibrated image with tweaked flat image: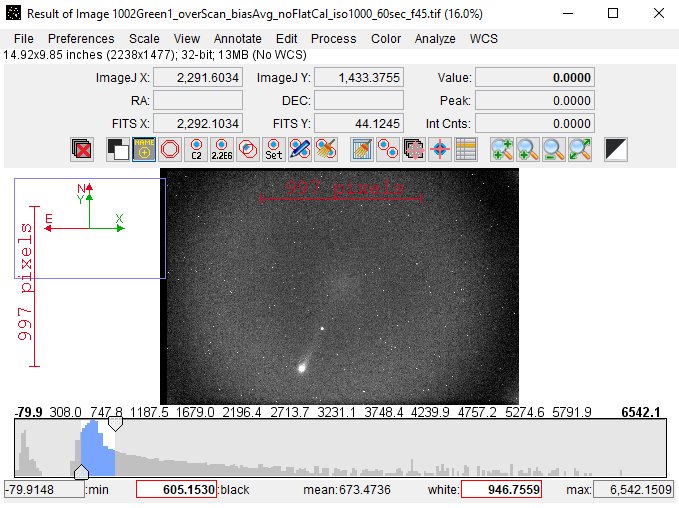
Now it looks much better, in the important areas the image is more flat now. The contrast change automatically so it's best to measure the level. I want it better than this, but first I must develop the Flatfield plugin more. I want it to save the last parameters so I don't have to put them in every time I run the function.
|
|