|
Advertisement / Annons: |
Tutorial:
|
Content:
Note: |
2: My travel equipmentHere is a list of the equipment I normally use today when I need to be transportable:
This is only a short summary over my equipment. The camera:Most DSLR cameras will be fine I think. But it's much easier if there is some way to do several photos by automatic (time lapse function). Some cameras has it built in. In my case I use an intervalometer to control the camera. The lens:Most lenses between 24 mm to 300 mm will be ok, prime lenses are normally better than zoom lenses. It's much more difficult with longer focal lengths. It depends very much on your mount how long focal lengths you can handle. In my case 150 mm is ok on a full frame camera. Big aperture give more light, but even with my Sigma APO 150mm f/2.8 I have to set down the aperture to f 4.0 if I want low vignetting and sharp stars. The core of a comet is almost a point object, but the halo around the core could be big, and the tail very big. The tail can be from nothing to couple of degrees or even more 10 or 20 degrees. The tail is the most beautiful so chosen your lens focal length to cover the tail and a bit more according the forecast of how big it's expected to be. Long time exposure control:I have an aftermarket intervalometer, not very expensive, 40 Euro. With 30 seconds exposures you get around 100 images per hour and with 1 minute exposures around 50 images. We have almost three hours of real darkness in middle of April on our latitude 60 degrees (Stockholm, Sweden). Red dot finder:With a telephoto lens it can be difficult to aim the camera at the object, comets are weak but from a star chart you know what stars are nearby to aim for. To make it easier I have bought a Red dot finder. I have not used it yet. 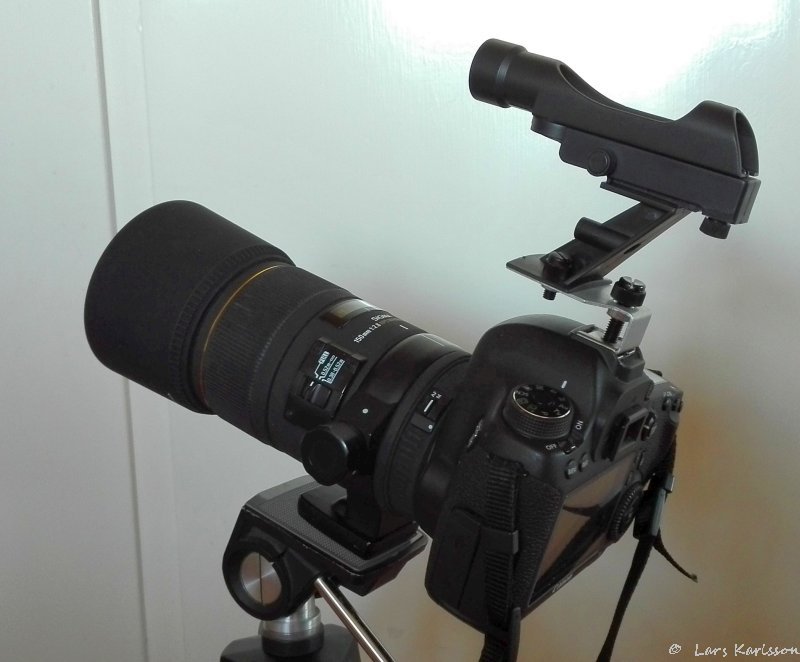
This is how it looks, Canon EOS 6D with the Sigma 150 mm f/2.8 APO lens and the Red dot finder on top. The mount:Normally you have a mount that is motor driven to follow the stars. You normally have that to follow comets too. Comets when they are at brightest can move very fast relative the stars because they are so close to Earth then. Then you have to shorten the exposures or have a more advanced mount were you can set the speed to match the comet's speed. It depends very much on your focal length how complicated it will be. I can do that on my EQ6 mount, but it's very heavy and I don't bring that mount with me. 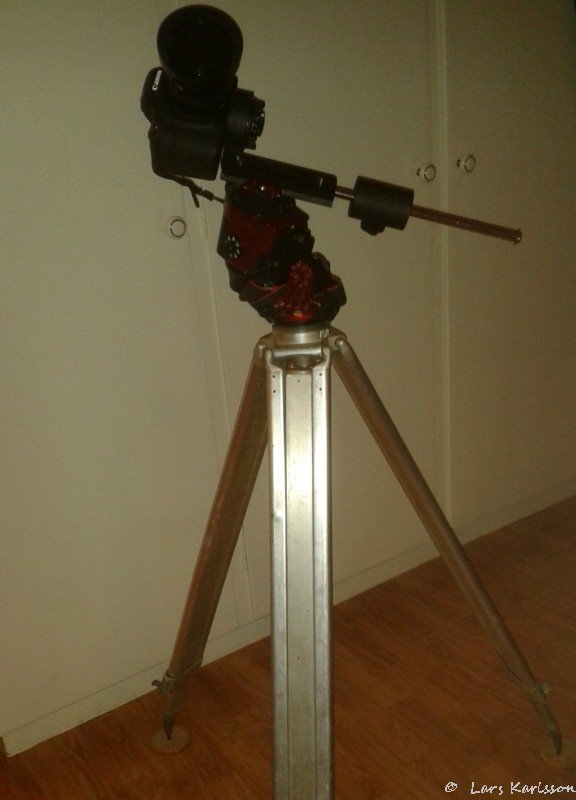
Here you can see the Star Adventurer mount with camera and lens mounted on the tripod: Here is my project about this mount and if you scroll down you can see my equipment list in detail: Anti Dew:I always had problem with dew on the lenses when doing astrophotography. Now I have built a heating band that I wrap around the lens. It's wiser if you buy an over desk heating band, they are not expensive. Exposure settings:It depends on a lot of things, darkness of sky, comets brightness, comets speed relative stars, focal length, motor driven mount or not. In my case with a 150 mm lens, a simple motor driven mount, and a comet that doesn't move to fast at the moment. Normally I set the ISO to 800 for deep sky objects which give better dynamic. But in this case with comets the stars will be trails so the dynamic isn't that important. Better to get better data on the comets weak tail. My camera a Canon 6D has it lowest readout noise at ISO 3200 and that is important if you do many short exposures. Maybe ISO 1600 is the best compromise in this case. Because the comet moves relative the background stars you can't have to long exposure times. In my case here maybe not longer than 60 seconds, but 30 seconds maybe better. Lens aperture settings, very common that I set it to f/4 for all my camera lenses. Wider opening only give more light in the center, the vignetting give bad result at the edges. The lens is also relative sharp at f/4.
All together: Only tripod:With a wide angle lens you can test to shot with just a tripod. Maybe at most 20 seconds with a 20 mm lens at high ISO 1600 or ISO 3200 if your camera can handle that. Don't oversaturate:In any case, don't oversaturate the core of the comet, it don't look nice. Most of my comets photos don't look very god because of light pollution, taken with my telescope which I have on the balcony in city. Buy new equipment:If you looking for astronomy related equipment to buy I think you can have use of my list of links: Focusing:Focusing is always very difficult. My Canon 6D camera has Wifi connection. With that I can remote control the camera focus from my smartphone. See this tutorial how I do it:
|
| Go Back |