Astrofriend's homepage

www.astrofriend.eu
../3dprinting.html
Share: Twitter Reddit Facebook Gmail Gmail Email
Search Astrofriend's homepage:

Valid CSS!

All pages shall now have been validated

Info Cookies (Kakor) / GDPR

Navigation

Advertisement /
Annons:

Twitter @AstrofriendLars

Follow Astrofriend

Tutorial News

Advertisement / Annons:

3D Printing:
My first 3D printer, assembling and setup


Contents:

  1. Introduction, unpacking and assembling sliders
  2. Installing the pillars on the bottom frame
  3. Installing the top limit switches and the top frame
  4. Installing the timing belts
  5. Installing the display and the filament feeder motor
  6. Installing electric devices and cables
  7. Adjusting the print bed
  8. Test print and test of Z-axis offset
  9. Installing CP2102 drivers and Cura
  10. Upload new 3D printer software - Marlin
  11. Mechanical calibration
  12. Setup Marlin 1.1.19
  13. Setup/Calibrate Marlin 2.0.0
  14. Tweaks
  15. Temperature P.I.D. optimizing
  16. Calibrate horizontal expansion
  17. Wind shield
  18. Replacing the nozzle heater
  19. To be continued

Note:
I take no responsibility or liability for what are written here, you use the information at your own risk!


14, Tweaks:

Now I have used the 3D-printer a couple of mounts, it print very well according to me. But as usual there are always something that can be done better. I googled on tweaking delta printers and found a lot of things to do. I have already checked the frame. At one page I found that they used rods with a magnetic coupler at the end. Something I don't have, but I also found one example where they put springs at the end of the rods to get rid of the backlash. I have heard the ticking noise when the printer head moves, something I must try.

Delta 3D printer tweaks:

There are a lot of information how to get 3D-printers to perform better.


Adding springs to the end of the rods:

3D printer, assembling and setup

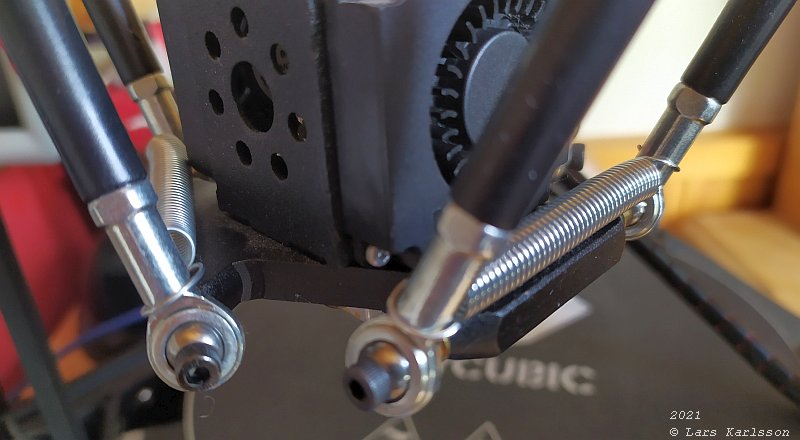
I bought a box with lot of different springs, I choose three of them and attached at the lower end of the rods. Very easy fix, and after that the noise from the 3D-printer was reduced. Later I will se if it also print with a better quality.

I have now used the 3D-prinder with these springs. I noticed that the printer is quieter and maybe little bit smoother surfaces.

Go Back to content

Go Back
To page XV

Advertisement / Annons: