|
Advertisement / Annons: |
Tutorial:
|
Content: |
6: Making of the calibration imagesWe have now seen how our image is made up of different components. To calibrate our image, we need something that explains how camera and lens/telescope distort our image, it is here the calibration images come in. Here how we "produce" these calibration images. NoiseDuring the calibration process, we will add, subtract, divide and multiply images with each other. In all these mathematical operations, we add noise to our image. The noise we add will come from our calibration images. We must reduce this to lowest possible level. One way is to take multiple calibration images and taking the average of them. The beauty of this is that after normalization to the same signal level as before the noise is reduced. If we start from 8 pictures it will reduces the noise by a factor of the square root of 8, about the third. So take several of each calibration image, 15 to 20 of each may be just right. More serious might take 50 of each, but also depends much on the quality of the sensor. In the examples here 8x used.
The creator of DSS has done a very fine example of much it helps to have many darks in the calibration process: Master bias frame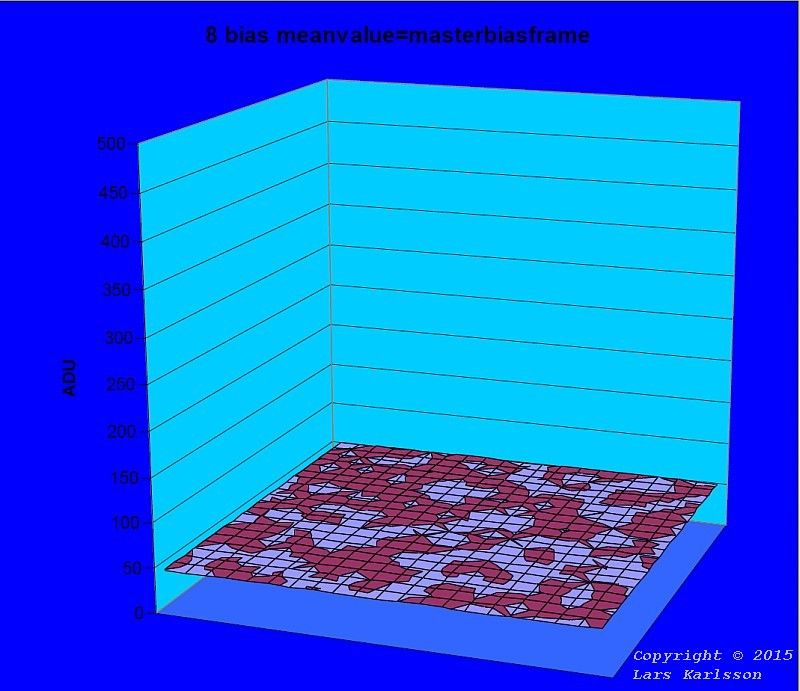
A bias frame is taken when the camera lens is covered, use for example lens cap on and have the camera in a dark place. In all astronomy-photography, the camera can be set in manual mode and that also applies to calibration images. Set the exposure in a very short time so that the dark current does not provide any contributions. Choose for example 1/1000 second. Repeat this 8 times to get more images. In the example 8x bias frames averaged and we store it as a master bias. A bias is independent of the frame temperature (almost), exposure and lens. It can thus be used to several other images. If you use different ISO settings it should be taken bias images for each ISO setting. Master dark frame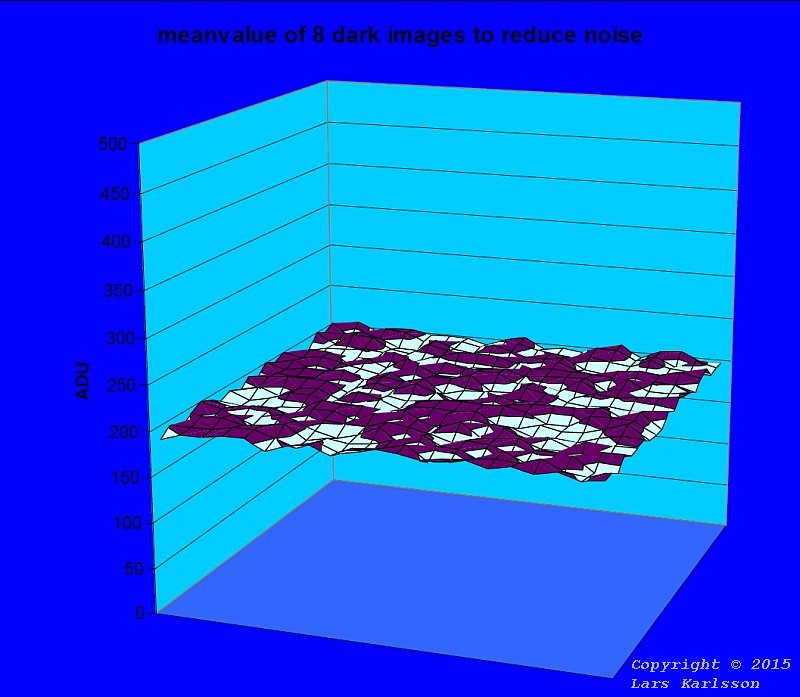
A dark frame is taken similarly to a bias frame.
Now, however, you choose the same exposure time that you have for your object image, often called light frame.
It is also important that the temperature and gain (ISO) is the same.
Repeat this 8 times to obtain multiple images (sub images).
The tricky thing about this is that you have to take them at the same temperature as when you took the light frames.
There is an another tutorial about this on my homepage that give some
tips&tricks, look here: Flat image also need dark frames, and it has to have the same exposure to, but not very temperature dependent because of the short exposures we use for flats normally. In the example 8x dark frames averaged and we store it as a master dark frame. Compare with the earlier in the introduction so clearly visible how noise is reduced. From this also our master bias frame is subtracted. In addition, the "hot pixels" fixed. They have been erased and replaced with averages from the nearby pixels with the software you use. Master flat frame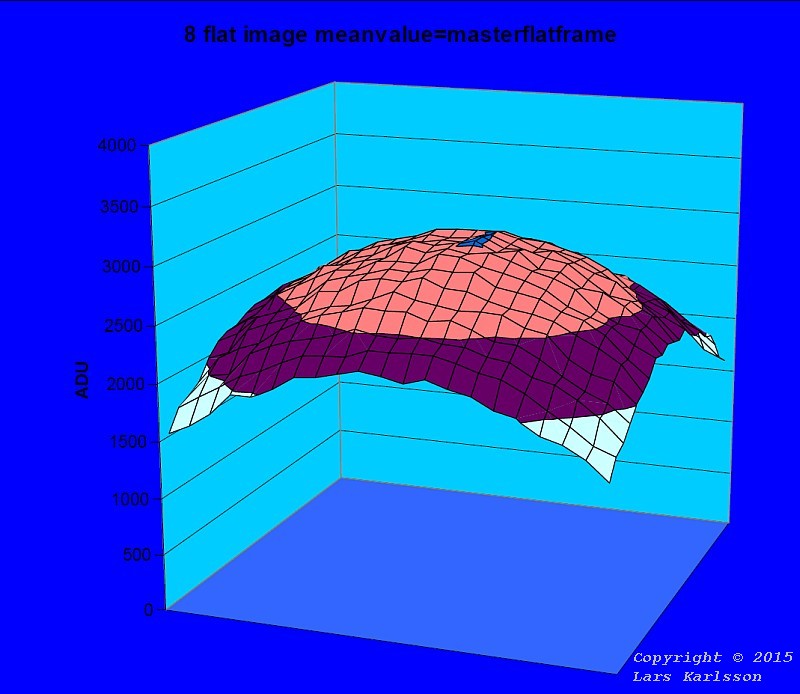
Flat frames are very difficult to take, the difficulty has to do how to get an evenly illuminated surface to shoot at. Some examples of how this can be done:
It is important that the lens is exactly in the same setup as when you take your object photo. The same aperture and the same focus, if filters is used, these shall also be put on. Repeat this 8 times to obtain multiple images. In the example, 8x flat frames averaged and we get a master flat frame. From this also our master bias frame and matching master flatdark frame shall be subtracted. Alternatively, a master flatdark frame containing the bias is subtracted directly (a-a=0) in this case. It depends on your software how to handle this. Histogram on exposures for flat framesA digital camera has a limited dynamic range. We must stay inside that. In this example with a Canon 350D, 12 bits (per color). The signal level is divided in 4096 different steps. Exposure must be selected so that the peak value is at about 50 to 75% of the maximum, in this case is about 2000 to 3000. 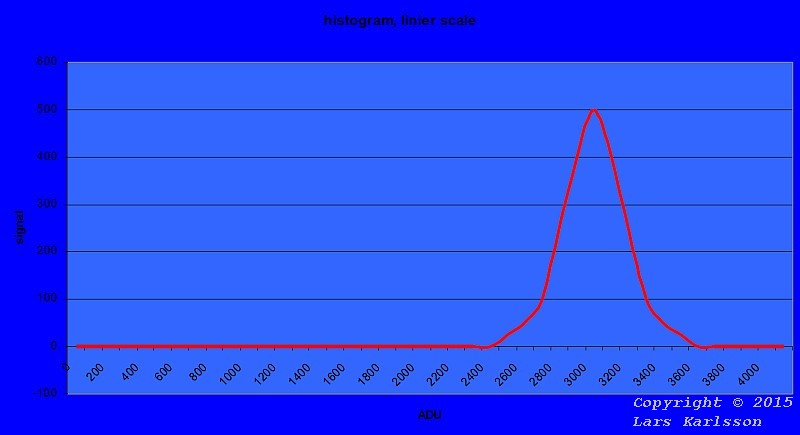
The exposure can be viewed in the cameras histogram window. The image above is linear along the x-axis, you see immediately when "Top" end up at 3/4 of the scale length. 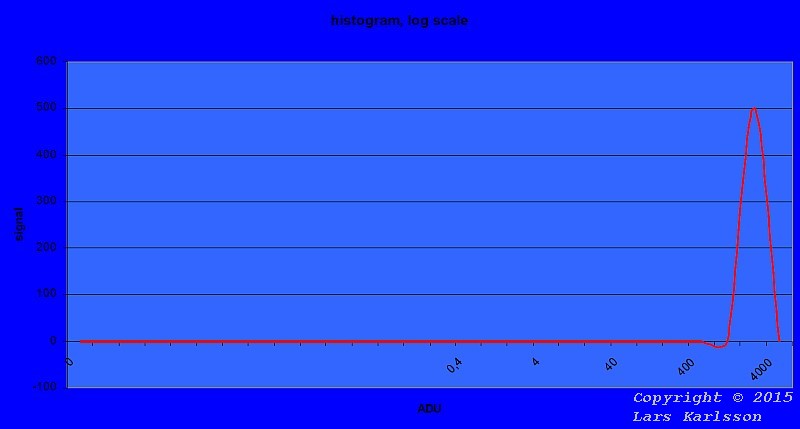
If it is logarithmic as this Canon camera has, then it looks as the signal is compressed to the right. Additionally, some sensors are strongly nonlinear at the higher levels, then it might be good to exposure on a lower level. Important is that the signal does not become clipped, i.e. fall outside the right side of the scale. To weak signal and it end up to the left, the signal becomes unnecessary noisy.
|
|