|
Advertisement / Annons: |
My astronomy project:
|
Content:
Related projects:
Note: |
4, Setup KStars and Ekos 64-bit:Astroberry isn't updated for Pi5 yet, maybe at the end of 2024. Until then the installation of Raspberry and Ekos must be done manually. But there is help, a script can be used to make this easier. There is a learning curve for me how to use this script, but it doesn't look too complicated. From the link above there are 5 steps to follow. Step 1, clone git repository:Here I have screen dumps of the process when installing the source files and compiling them. All done with the script. The commands are typed in to the commando window below in the Raspberry. I add more text later that explain what's going on. 
Follow the instructions from Indi forum. Give the first command and the downloading of needed files to compile is downloading.
Check what maps has been created:
Sometimes when giving commands it could ask for your password. Step 2, enter cloned directory: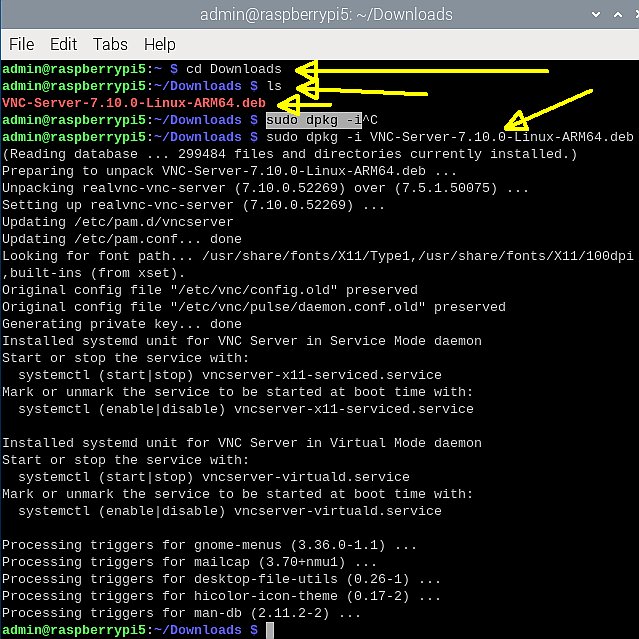
Changing directory to where the downloaded cloned files is stored.
Step 3, install dependencies:
Install dependencies files.
This is a slow process, totally it took more than one hour to do this. The Raspberry could be hot, have good ventilation around it to cool it down. After a while it ask if you want to continue. If okay, type Y and return. Step 4, If you are using QHY camera:
I have a QHY guide camera and installed the needed extra files for this.
Step 5, run one of build- -xxxx:
I chose to build the stable version and give this command. Note that the instructions missing the "./", that's why I got an error message.
After 17 minutes it has come this far. 
41 minutes later, still installing, reusing some objects and continue. 
After 47 minutes it has starting building the objects. 
95% done and 77 minutes later. 
Linking libraries. 
Finished at last, 96 minutes, one and a half hour. Checking which KStars version that was installed:
I want to be sure that I have installed the 64-bit version of KStars. This command give me information where to look:
And this command give me the information of what's installed which include the information from above:
It return the line: "ELF 64-bit LSB executable". Sounds correct. Now what's left is just to do a normal setup of the KStars/Ekos.
|
|